Are Your Gutters Prepared for the Rainy Season?

One of our clients has huge, two inch deep rivets in the siding on her house. A couple of years ago we replaced the gutters around her front porch. They were bent, cracked and leaking everywhere. But the damage had already been done to the wood where the gutter touched the side of her house. Now a woodpecker has left his mark, shredding the pliable, damaged wood to find his next meal.

Poor Gutters Cause Damage

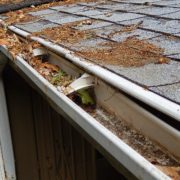
To protect your home from damage, functional gutters are a must. Just as important as a roof and siding, gutters fend off water damage. Without them directing the flow of water, it would pour directly over eves, eroding the soil around the foundation of your home. And even if you have gutters, they may not be functioning optimally. Bad gutters can cause just as much damage, including:

  • Leaks that damage and weaken siding
  • Water collecting around the foundation of the home, which can cause flooding and even foundation damage
  • Backed-up gutters can cause roof damage from excessive debris, ice dams in colder temperatures and water pooling under shingles
  • Mold growth anywhere the water is pooling and not directed away from the home properly
  • Damage to landscaping from gutter overflow

If you need to install new gutters, HA Construction can certainly help you with that. We recommend that all eves and overhangs have gutters directing water flow to an appropriate run-off location in your yard (i.e. downhill, away from the home).

Keep Those Gutters Clean

Once new gutters are in place, then maintenance is key. First, we recommend gutter guards of some kind, whether that’s the full-throttle gutter system with covers, or mesh wiring to keep most large debris out of the gutter (such as leaves and sticks).

Even with guards in place, you’re going to need to clean the gutters. They will likely need to be cleaned at least once in the fall. Even if you don’t have large trees, wind blows leaves everywhere. And if you do have large trees that require raking your yard multiply times throughout the season, then you should add gutter cleaning to your yard work regimen each fall.

It’s also a good idea to clean the gutters after the final thaw in early spring. This will give you the opportunity to check the gutters for damage from ice and snow (snow is actually quite heavy and, in large accumulations or a long winter, can create bends, breaks and leaks).

Really, at the end of each season is an ideal time to at least check the gutters for debris and damage, otherwise you may find yourself replacing them again long before you should be. As with any aspect of your home, diligence is key to keeping everything functioning as it should and preventing damage.

Here Fishy, Fishy | Best Ways to Display Your Home Aquarium

Are you a fish lover? I don’t mean tilapia on tasty fish tacos. I mean the kind you could just stare at for hours as they swim and scuttle around an aquarium. There is something rather soothing about the rhythmic to-and-fro of anything from little guppies to puffer fish in clear water among decorative stones and “sunken treasures.”

There are a number of options for displaying your aquarium, big or small. What it really depends on is how much of a feature you want it to be in your home, and whether you go with salt water or fresh water creatures.

Salt vs. Fresh Water

Let’s start there. And I’m going to be honest right from the start: salt water aquariums are significantly more expensive to establish and maintain than fresh water aquariums. The fish and other water creatures cost more, and you need live algae and plants to help keep a saltwater tank clean. You need sand as opposed to rock and not only do the sides of the tank need to be cleaned, but the sand does too. In fact, with a larger saltwater aquarium, you’re better off hiring a professional to come clean it once a month so that you know it’s done correctly and regularly.

That isn’t to say that saltwater aquariums aren’t worth the expense; they are certainly more colorful and more beautiful than a fresh water aquarium, which often requires brightly colored rocks and other accidents to give some punch to the duller colors of most fresh water fish.

There are, of course, exceptions to the dull tones of freshwater fish, such as brightly colored goldfish, bettas (be careful what you pair these aggressive buggers with – especially avoiding other bettas), mollies and discus, to name a few.  An added benefit to a freshwater tank is that they’re easier to clean, especially if you also use a filter. The fish are significantly cheaper (which means they’re easier to replace too).

Where to Display Your Aquarium

So, we’re going to sort of skip right over the small 10 gallon tanks that go on a counter somewhere. They don’t add anything drastic to your home décor and are often there for the sake of having fish (a noble cause indeed). But when you get into the big kahuna that becomes the centerpiece of your living room, there are a few things to consider.

If you plan to do a built in tank – such as built into a wall or around a fireplace as pictured here – you have to make feeding and cleaning easily accessible. If you read the link above, you’ll see that a saltwater tank requires at least 15 minutes a day of maintenance – so you need daily access to your swimming pets.  A cabinet disguised as a wall that gives you access to the top of the tank is a good idea.

As you look at your aquarium location, keep these factors in mind:

  • Keep it away from windows, especially those facing the east or west. Sunlight is the leading cause in algae growth, so if you want to minimize it, no tank by the window.
  • Avoid placing an aquarium near a door; the sudden movement may not stir you up, but the vibration can scare and cause stress on your fish.
  • Large vents, radiators, or air conditioners can change the temperature of the water in your tank, which is something you want to keep relatively the same at all times to keep your fish healthy.
  • Use a stand, table, built into the wall, whatever you desire, but don’t put a fish tank directly on the floor.

There are a lot of options depending on what you want and where you want the aquarium to be. HA Construction can certainly help in that design, and work together with your “fish guy” to showcase your fish in the ideal location of your home.

Updating Rock and Brick Walls in Your Home

So you fell in love with the “bones” of your new-to-you home… not so much the 70s décor. As you renovate your new found treasure, it’s easy enough to replace wood paneling with sheetrock. And, while it’s not easy, scraping a popcorn ceiling is doable.

And you love the full rock wall inside your sunroom. Or the all brick fireplace. Well, “love” is a strong word. Maybe it’s more likely that you love the idea of it, but the deep red color of those bricks certainly dates the room.

There are a few easy fixes here – they might even be easier than you expect – where you can change the appearance of your interior rock and brick surfaces while maintaining their integrity, emphasizing their beauty, and not getting all Italian-villa-exposed-brick-cheesy.

Painting

The obvious answer to changing the appearance of interior stone or brick, shy of doing a complete demo and starting over, is to paint it. But this approach only has appeal with certain décor choices. It’s a very pristine look and works well with a modern design.

Painting brick is fairly simple and shouldn’t take more than a day if you’re working on an interior space. Keep in mind that, depending on the color you go with, painting stone or brick may require a primer.

Whitewashing

If you’d like to keep the natural integrity of the stone or brick – maintaining a rustic look, but without the stark contrast to the rest of the room – then whitewashing the stone may be a great option. All you need to do is:

  • Take a before picture of the stone or brick
  • Clean the stone with a wet cloth
  • Place a splash guard over the floor b/c there will probably be dripping
  • Water down the paint of choice in a bucket of 1:1 ratio paint and water
  • With a cloth or sponge, soak up some of the water mixture and  ring it out tow where it’s wet but not dripping
  • Rub the watered down paint on the brick surface until covered


Allow each coat to dry and then take another picture. Compare it to your before picture because the changes you see with the naked eye will be subtle, so the pictures will help you to determine if you want to apply another coat or not. Continue to apply coats until you reach your desired muted tone to fit the design of the room.


If you’re unsure how to get the look you desire, or want some other ideas on how to deal with an unsightly stone or brick wall or fireplace, HA Construction is happy to come take a look and help brainstorm with you. Our expertise may come in handy in helping you to think outside the box.